Saturday, December 29, 2012

Why is Xbox 360 HDMi cable not working?


When you connect an xBox 360 to a TV with HDMI for the first time, the xBox 360 often defaults to the highest resolution it can produce. For many TV's this may be too high. You may receive a message like "UnSupported" or "Not Supported" or "UnSupport", etc. So you cannot see the xBox 360 menus, but you will probably hear the boot up sounds, and menu ticks/clicks. If you ask people that aren’t intimately familiar with this specific problem, they’ll tell you to check the HDMI cable, the 360, etc. Don’t listen to them.

The solution to this problem is to blindly navigate into the Display settings to change the display resolution to something that your TV can display.

Here’s a step by step guide:
1. Connect your 360 to your TV with the included composite (Yellow, Red, White) cable .
2. Ensure you're running the new Xbox dashboard (Avatars support).
3. Ensure no profile auto-sign's in at boot up.
4. Power off 360 and TV. Connect the HDMI cable between them.
5. Hold down the controller's xBox button for 3 seconds to power on, and wait for about 20 seconds.
6. Press right on the (dpad) left analog stick 9 times, to navigate to the System Settings menu.
7. Press the A button 4 times. (This will go to System Settings, Console Settings, Display, HDTV settings.)
8. Press up twice on the (dpad) left analog stick. Press A.
9. If no picture appears, wait 15 seconds, Press up again and press A. What you are doing is selecting lower display resolutions. Once you have a picture, you can try other higher resolutions, if you want, and it will revert back if you don't confirm it is ok. The 360 will remember the setting you finalize.

Troubleshooting: Power off both 360 and TV. Switch back to the composite cable. Try steps 1-7 again to verify it is navigating correctly. If your profile is auto-logging in, the 360 will start on the “Welcome” tab, rather than the “Play Disc” tab, in which case, you would have to press up once, before the 9 rights, to get to the System Menu. (The end.)

If you haven't the HDMI cable for xbox 360 , It's available at zeromartz.com

Tuesday, December 11, 2012

Xbox 360 Slim Case Unlock Kit - Opening Tools


Disassembling the Xbox 360 Slim console is tough and a pain to work with. A lot of gamers broke their console trying to disassemble the Slim and we are now releasing an affordable toolkit that will allow you to take your console apart much easier. Take a look and I think you will agree!!


The Xbox360 Opening Tool Kit is avilable at zeromartz for $12.50 and free shipping.

Tuesday, August 21, 2012

Best HDD Hard Drive for Xbox 360 slim

Xbox 360 slim 320GB Hard Drive

Bring home the Xbox 360 320GB Hard Drive to enhance your gaming fun. You just have to place the gaming hard drive into your Xbox device. It will provide you with more space to store games, HD movies, TV shows, music and demos. You can even install game discs to this Xbox 360 hard drive. It includes the fully downloadable Xbox 360 game LEGO Star Wars III: The Clone Wars. This hard drive provides more storage space for more fun with your Xbox 360 game system.

Xbox 360 320GB Hard Drive:

Best option for media enthusiasts who game on Xbox 360 Slim

Large storage option for Xbox 360

ONLY Compatible with Xbox 360 SLIM System, Not work for Xbox 360 FAT System

Greatly expands your Xbox 360 experience with downloadable content

Saves your game progress, Xbox LIVE® gamer profile, game demos and custom soundtracks from your own music collection

And downloads movies and television shows from Xbox LIVE Marketplace easily

Just plug in the hard drive slot of the S console

And start right away to download demos and install games to this HDD

If you wanna replace your old & damaged HDD or just want to swap for a bigger one, go for it!

Note: Please make sure your Xbox 360 has been shut down before install the hard drive

Or the active Xbox 360 will broke the hard drive when install

Size: 105 x 74 x 19mm

Color: black

Designed by third party, not made by Microsoft


Package Included:

1 x HDD Hard Disk Drive for XBOX 360 Slim


250GB HDD Hard Drive for Xbox 360 Slim

 This Xbox 360 Slim 250GB Hard Drive is the best  option for media enthusiasts on Xbox 360. With this, you will have more room to  store your entertainment.
It is the largest storage option for Xbox 360 Slim . Also ,you could expand your  Xbox 360 Slim experience with download content.
250-gb-hard-drive-for-xbox-360-slim-1.jpg
Features:


Brand New
Allows users to expand Xbox 360 Slim experience with download content such as demos, movies, television shows from X box Live Marketplace
Allows you to save game progress, X box Live gamer profile & custom soundtracks from your own music collection
Play original and retro games in Xbox Live  Arcade
Compatible With Xbox 360 Slim consoles ONLY
Color: Black
Storage Capacity: 250GB
Kindly remind: Because the drive stored some system files, the available  space would be about 228gb
250gb-hard-disk-for-xbox360-slim.jpg
Specification:

    * Color : Black
    * Case : Microsoft Xbox360 specialized
    * Interface : 2.5 in SATA
    * RPM : 5400
    * Inner drive : Westen Digital
    * Storage Capacity: 250GB
    * Weight: 167g
    * Dimensions: 119 * 96 * 36(mm)

Tuesday, August 14, 2012

How to Connect An Xbox 360 to Your TV

Choosing the Right Spot for Your Xbox 360
 

This is the back of the Xbox 360. The ports for the power cable, A/V cable, and ethernet cable are pretty easy to find. When you set up your Xbox 360, make sure it is in a well ventilated area that is free of dust. Dust and overheating are the two main causes of problems in electronics so choosing the right placement for your Xbox 360 is important.

Xbox 360 AV Cable


This is the standard Xbox 360 A/V cable that comes with the premium version of the Xbox 360. The wide silver end connects to your Xbox 360 while the other end connects to your TV. The Yellow (video) cable is for standard, non-HDTV sets. You will also use the Red+White audio cables for a standard set. If you have a newer TV or an HDTV set, you can use the Red+Green+Blue video connections along with the Red+White audio connections.

Connecting The Xbox 360 To The Back Of Your TV


 This shot shows what the back of most TVs look like. If you have a standard TV, you'll only have the Yellow+Red+White connections. If you have a newer TV or HDTV, you should have the same connections that are shown in the pic. This step isn't too hard since the cables from the Xbox 360 and ports on the back of your TV are all color-coded.

A/V Cable HDTV Switch


If, and only if, you have an HDTV and want to use your Xbox 360 in 480p, 720p, or 1080i resolutions you have to slide a little switch over on your A/V cable. On the end of the A/V cable that connects to the Xbox 360, there is a little switch that you'll need to click over. If you do not have an HDTV, you can skip this step.

AC power adapter for XBOX 360

 Now that you have the audio/video cables connected, the next step is to hook up the power supply. Connect the two parts as shown in the picture and then connect the "power brick" end to your Xbox 360 and the other end to a wall outlet. The big power brick needs plenty of ventilation just like the main system so try to have an open space on a shelf for it. It is not recommended that you set it on the carpet. 


Power Up And Get Playing

Once you have everything hooked up, you are ready to go. Press the large circular power button to get things started.

If you have a wired controller, plug it into a USB port behind the little USB door. If you have a wireless controller, hold the silver "X" button in the middle of the controller until the upper left quadrant of the system power button as well as the ring around the "X" button on the controller light up. If it doesn't light up, press the controller connect button on the Xbox 360 as well as the connect button on the top of the controller.
If this is the first time the system has been used, you'll have to go through an onscreen setup process. This is simply setting up your player profile, choosing HDTV settings if available, and/or signing up for Xbox Live service. The system walks you through everything.
Now you are ready to play.

Tuesday, August 7, 2012

Cheap XBOX 360 Accessories For You

Here are some of XBOX 360 accessories you might find useful and currently at its cheapest prices that will enhance your gaming experience and not break your wallet.

Wireless Controller for Xbox 360

epc-box-406-1-lThe XBOX Wireless Controller for Windows delivers a consistent and universal gaming experience across both of Microsoft's gaming systems.2.4GHz XBOX 360 Controller with 30-foot range. Use up to four controllers simultaneously on one console. Integrated headset port for XBOX LIVE play. Adjustable vibration feedback for longer battery life. New left and right shoulder buttons are designed for ease of use. Use the XBOX 360 guide button to keep track of your friends, access your games and media, or power on and off your XBOX 360 console.Experience the ultimate gaming experience on Windows XP and XBOX 360 with this XBOX Wireless Controller.
The cheapest price you can get for this accessory is around $38 - $42 USD.

3600 mAh Batteries for XBOX 360 Controller

epc-box-406-1-l If you are thinking that the default 1800 mAh is not enough for your 8-hours-gaming-a-day routine, you might want to get a brand new 3600 mAh batteries for your XBOX 360 instead. True, it will make your battery charging a little bit longer, but what you will get is a fully-charged controller with gameplay time about twice than your default XBOX 360 controller.
The cheapest price you can get for this accessory is around $8 - $12 USD.

XBOX 360 DVD REMOTE CONTROL MEDIA PLAYBACK CONTROLLER

18702116264701b9d8bd00a If you are considering to turn your XBOX 360 as your primary media center, this might be what you will need. This remote control specialized for XBOX 360 will allow you to connect to your XBOX 360 and play media by simply using commands from this remote. The XBOX 360 remote allows connection solely to the XBOX 360 consoles, and allow a connectivity to be established between your XBOX 360 and Windows XP/Vista/7.
This item can be bought with the average price of $5 - $7.

Xbox 360 wireless gaming Receiver

jmzj1246531667406 This Xbox 360 wireless gaming Receiver is a simple adapter that connects into a USB 2.0 port on your PC and let you use the Xbox 360 Wireless Controller, Xbox 360 Wireless Headset, and Xbox 360 Wireless Racing Wheel on your computer. 6 foot cable let you conveniently hook it up to a rear or front USB port. Use the Xbox 360 Wireless Gaming
Right now, the cheapest price you can get for this item is about $15 - $ 18.

VGA AV 2 RCA HD cable 4 Microsoft Xbox 360 XBOX360 

10646812894701b6db9da60 This is the thing for you if you are looking forward to seeing any progressive to HD resolution on a HD monitor, but with problems of not having a HDTV. By using this, you can plug this in your VGA cable to your gaming monitor (if you have one) and the red and white cable to your audio inputs. You will now experience a widescreen, almost HD resolution of 1080i to enjoy on your PC monitor.
The cheapest price you will need for this item is about $6 - $7.5 USD.

We Also Recommend...

Using your Xbox 360 Controller on your PC

Tuesday, June 12, 2012

Xbox 360 Slim Hard Drive Case Shell


Overview :

Features :
  • Compatible only with Xbox 360 Slim consoles
  • Replacing your old, damaged, broken hard drive or case
  • Ability to use your own HDD or old Xbox 360 HDDs
  • More room to grow your entertainment
  • Play, watch, save, store – expand your entertainment possibilities
  • Plenty of room to store all of your favorites from Live!
  • It’s the easiest way to get the most from your Xbox 360

Quality/Usability : For those who purchased or received an Xbox 360 Slim 4GB version, will sooner or later find out that they will probably need more HDD space, once you factor in downloading content, movies and game saves. You can go out and spend $130USD on Microsoft's own 250GB HDD but like all OEM products, they are overpriced. You can even use your own HDD but this requires some precision aiming to get the HDD to land correctly onto the connections, as seen below:


Just dropping in the HDD into the Xbox 360 Slim is not stable as the HDD can wobble around inside the bay and may even damage the connections. If there is a way, there are accessories. Never count out 3rd party manufacturers. To help gamers fix the wobble issue and to provide a cheaper solution and alternative, there is the Xbox 360 Slim Hard Drive 
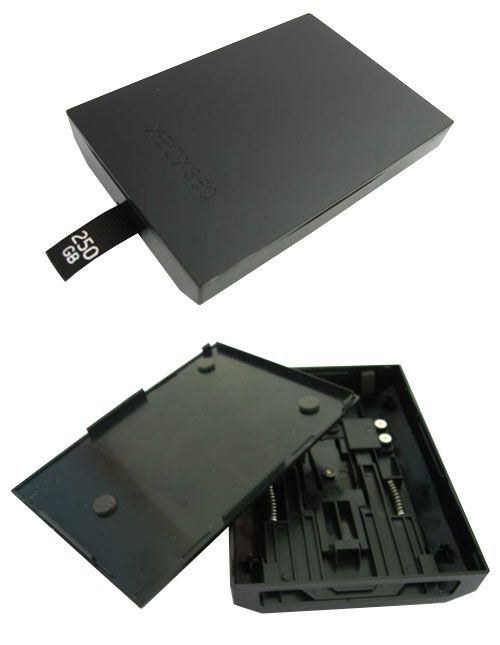
Case Shell. This allows you to use your own HDD or from an old Xbox 360 without the risk of damaging the HDD or Xbox 360 Slim console. The case is made of plastic. There are no screws to hold hard drive in place and no screws to hold case together.

If you're using your own hard drive that you bought from a store or had laying around (it must be Western Digital 2.5"), you'll need to do more than just dropping the HDD into the Xbox 360 Slim. The new HDD will need to be formatted to work with the Xbox 360 Slim console using HDDHackr and a PC.

How to use HDDHackr : (file attached and does not contain any copyrighted files)
- HDDHackr is made only for real MS-DOS, not for Windows Command Prompt or even Windows XP/Vista/7!

HddHacker supports two flashing modes, Auto and Manual. Typing HddHackr at a DOS prompt will start auto mode. In auto mode all hard drives will be detected automatically. In manual mode you can enter all the parameters used for flashing by hand.

The following help screen is displayed if you start HddHacker with a wrong number of arguments:

HDDHACKR [C|D|F|R] [PORT] [DRIVE POS] [SECTOR FILE] [RESTORE FILE]
C: Create Partitions 0/2/3
D: Dump sector 16-22 from XBOX360 HDD to file
F: Flash Western Digital firmware
R: Restore Western Digital firmware
PORT: Port to send command to e.g. 09F0
DRIVE POS: A0 for Master, B0 for Slave
SECTOR FILE: Sector dump file e.g. HDDSS.BIN
RESTORE FILE: Firmware restore file e.g. UNDO.BIN

Example for create, dump, flash and restore:
HDDHACKR C 09F0 A0
HDDHACKR D 09F0 A0 HDDSS.BIN
HDDHACKR F 09F0 A0 HDDSS.BIN UNDO.BIN
HDDHACKR R 09F0 A0 UNDO.BIN

Explanation of the Parameters

[C|D|F|R]
- this will set the mode of operation, it is recommended to first try to dump the XBOX360 hard drive data, if the dump will fail, it is highly unlikely that a flash or restore will succeed on the Western Digital drive

[PORT]
- the port to which the Hard Drive is connected, a port number should always be entered in hexadecimal and have 4 hex digits, valid ports are: 01F0, 09F0, .....
- this option can be used if your PCI adapter card or on board SATA ports are not identified by the auto mode

[DRIVE POS]
- on SATA ports this value is always A0, cause you can only connect a master drive to a SATA port, so for SATA you will always type A0 here

[SECTOR FILE]
- name of the sector 16-22 dump file better known as HDDSS.BIN

[RESTORE FILE]
- name of the firmware restore file e.g. UNDO.BIN

Using HddHacker in manual mode
* Dumping the HDDSS.BIN file *
Boot to MS-DOS from a writeable medium (like a floppy or UBS Stick).
Connect an *original* Xbox360 HDD to your SATA controller. Make sure it is the only SATA device that is connected. Now run 'HDDHACKR D [PORT] A0 HDDSS.BIN' and it will create the file 'HDDSS.BIN' and save it to the path you've started HddHacker from.

* Creating Partitions 0/2/3 *
In auto-mode the Partition 0/2/3 will be created automaticly to make the drive compatible with "Xplorer360" and XBOX360 Console. In manual-mode you have to type 'HDDHACKR C [PORT] A0'.

* Flashing your Western Digital *
Turn off your PC and connect the Western Digital hard drive. Boot to MS-DOS again.
Type 'HDDHACKR F [PORT] A0 HDDSS.BIN UNDO.BIN' from the same path you have saved the HDDSS.BIN file to. This will create an 'UNDO.BIN' file that you need if you want to undo the hack and flash your firmware back to the original state.

* Restoring your WD to original state *
If you don't want to use your modded WD HDD in your XBOX360 anymore and you want to flash it back to its original size/state, then you can now do so. Boot to MS-DOS and run 'HDDHACKR R [PORT] A0 UNDO.BIN'. This will use the UNDO.BIN file you created before to restore the drive to its original state.

* Vendor Intro Power Brute for misflashed drives *
To enter the recovery mode you should boot to MS-DOS, connect your hard drive to PC and type 'HDDHACKR R [PORT] A0 UNDO.BIN'. If the hard drive is misflashed you will be prompted with:
"Western Digital Vendor Intro failed on port [PORT]"
"Do you want to resend the command until the drive responds (Y/N)?"

Press YES, disconnect the hard drive from power and connect it again.
You should get Status 0x50 and the drive will be reflashed.


If you plan on using your hard drive from your old Xbox 360, you won't need to do any formatting to get it to work as its already formatted but you'll need tools to help you dismantle the old hard drive case. I suggest picking up the Shinobii Tool Kit to make things easier. This has all the tools needed and more, which can be used for other electronic devices. Below are instructions on how to dismantle your old Xbox 360 hard drive: (performing this will void your old Xbox 360's hard drive warranty)

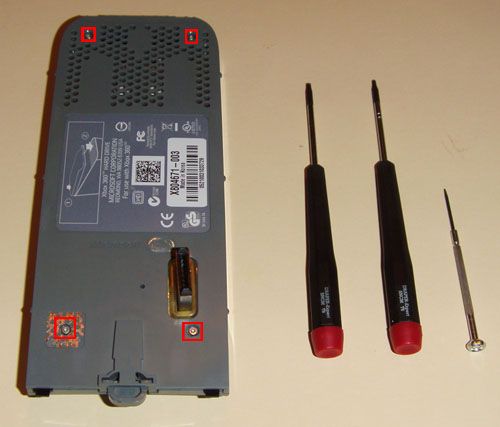
Opening the Xbox 360 drive enclosure

To open your Xbox 360 hard drive, you will need a Torx T6 screwdriver. Remove the 3 screws and the 4th screw is behind the hologram sticker. You can either poke through the sticker or remove the sticker. Either one of these will void the warranty on the hard drive:


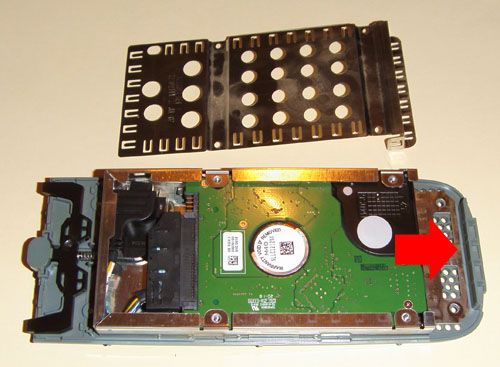
You can now remove the top cover. Next, you have to remove 4 screws from the metal plate. These require a Torx T10 screwdriver:


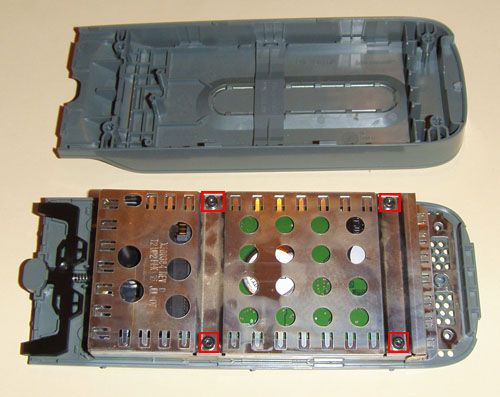
You can now remove the metal plate. All that is left is to slide the hard drive out.


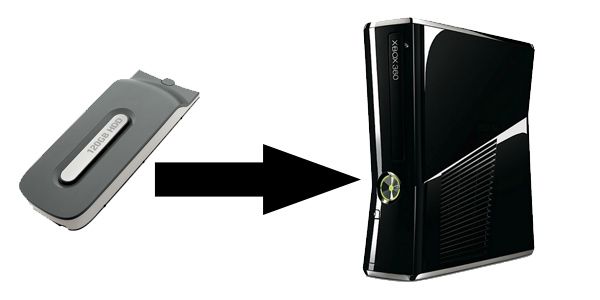
To insert the new Xbox 360 Slim HDD Case, simple remove the bottom grille plate from the bottom of the Xbox 360. Pulling this plate back will reveal the hard drive bay. Simply insert the new hard drive case into the bay and push it in until you hear a click. This click will let you know that the HDD is in place and connected to the Xbox 360 Slim. Just make sure that he ribbon is facing out. This allows you to grab and pull out the hard drive when you need to.

Once you format a new hard drive using HDDHackr or removed the hard drive from your old Xbox 360 hard drive, you can insert it into the Xbox 360 Slim HDD case. Simply place the HDD inside the case and snap the cover to the case. Since there are no screws to hold the HDD in place, you can get some double sided mounting tape and cut off two small rectangle pieces and place it on the inside of the case to prevent the HDD from moving. Once the cover is snapped on, its fit snuggly and will not easily come off. When inserting the hard drive into the Xbox 360 Slim, the connector goes in first. Once inserted, push down on the hard drive until you here it click. The tab on the hard drive shell case allows you to easily remove the hard drive when needed.

Conclusion : Overall, the Xbox 360 Slim Hard Drive Case Shell is a must have for those planning to take their old Xbox 360 hard drive or their own and placing it into the Xbox 360 Slim. The case gives support for the HDD and fits perfectly into the Xbox 360 Slim. Even if you purchase a pre-installed aftermarket 250GB Xbox 360 Slim HDD, you're only paying $57. That's more than half the price of what Microsoft would charge you for their Official 250GB hard drive.

What I have noticed in our video was that a lot of people have asked if this would void your warranty and would you get banned. Lets start with the warranty concern. You will NOT void your warranty on your Xbox 360 Slim. If your Xbox 360 Slim fails and needs to be sent to MS to be repaired, simply remove the HDD. Nothing is permanent and MS won't know it was installed. The only warranty you will void however is your old Xbox 360 hard drive. There is a screw behind the warranty sticker so this would need to be removed or punctured to get to it. If you're going to use your old hard drive, you probably don't care by now as the warranty has probably expired.

As for being banned, you will NOT get banned. There is no hacking or cheating involved and no change the Xbox 360 firmware/dashboard. You're simply increasing storage space. The concept is the same as buying Microsoft's own 250GB hard drive just that you're using own you and more work is required. With the case of the old Xbox 360 hard drive, just think of it as putting it in a new case. So do not be afraid.

Monday, June 4, 2012

No Storage Devices Found on your Xbox 360 S

If you are using an Xbox 360 S that comes with a hard drive, use the following steps to ensure the hard drive is properly connected.
  1. Turn off the console.
  2. Locate and open the Hard Drive cover.
    1. Position the console horizontally looking at the front.
    2. On the right side of the console, locate the hard drive cover release which is close to the back of the console.
    3. Slide the release toward the front of the console, while pulling open the hard drive cover.


  3. Remove the Hard Drive.
    1. Pull the hard drive tab firmly until the hard drive comes out.


  4. Reconnect the Hard Drive.
    1. Insert the hard drive firmly fully until it clicks.


    2. Put the hard drive cover back on.
  5. Power on your console and see if the hard drive is now available.

How to fix Xbox 360 Hard Drive: "No Storage Device Found" error?

This problem occurs when your original Xbox 360 console does not detect a hard drive or memory unit. Typically, this error occurs when a hard drive or memory unit is not attached properly to the console.

Note If you have an Xbox 360 S console and receive this message, see the article:
Error: “No storage devices found” or similar messages on an Xbox 360 S console

If your hard drive or memory unit is not listed as a storage device on your original Xbox 360 console, try the following solutions.

If you have an Xbox 360 Hard Drive

Solution 1: Make sure your hard drive is attached

  1. Locate the hard drive on the top of your console (or on the left side, depending on how your console is oriented).

    Note Not all Xbox 360 consoles include a hard drive.

    Hard drive
  2. Make sure the hard drive is correctly attached to your console. For information about how to attach a hard drive, see the following Knowledge Base article:
  3. Turn your console off, and then turn it on again.
  4. Check if your hard drive is listed. Here's how:
    1. Go to the Settings hub, and choose System.
    2. Select Storage.
If your hard drive is not listed, try the next solution.

Solution 2: Turn your console off and back on again

  1. Turn your console off, and then remove the hard drive.

    Remove the hard drive
  2. Turn your console on, wait for it to start up, and then turn it off again.
  3. Reattach the hard drive to the console, and then turn the console on again.
  4. Check if your hard drive is listed. Here's how:
    1. Go to the Settings hub, and choose System.
    2. Select Storage.
If your hard drive is not listed, try the next solution.

Solution 3: Try another console or another hard drive

  1. Try one or both of the following:
    • Attach your hard drive to another console.
    • Attach another hard drive to your console.
  2. After you have done one of those two things, check if your hard drive is listed:
    1. Go to the Settings hub, and choose System.
    2. Select Storage.
If your hard drive is not listed, try the next solution.

How to attach or remove your original Xbox 360 hard drive

This article explains how to remove and attach an Xbox 360 hard drive. For Xbox 360 S console instructions, please see the following article:
How to add or remove your Xbox 360 S hard drive

Note When you remove or attach your Xbox 360 hard drive, avoid touching the hard disk drive bay contacts or the hard disk drive connector with your fingers or metal objects.

To remove your Xbox 360 60G hard drive

  1. Turn off your Xbox 360 console.
  2. Locate the hard drive drive on the top of your console (or on the left side, depending on how your console is oriented).

    Note Not all Xbox 360 consoles include a hard drive.

    Location of the hard drive
  3. Press the release button on the hard drive.

    Press the release button
  4. Lift the hard drive away from the console.

    Lift the hard drive

To attach your hard drive

  1. Turn off your Xbox 360 console.
  2. Position the back of the hard drive against the back of the hard drive bay.

    Note If your console did not previously have a hard drive, you will need to remove the hard drive bay cover before attaching a hard drive.

    Position the hard drive

  3. Push the front end of the hard drive down until it clicks in place.

    Push the hard drive down

How to add or remove your Xbox 360 S hard drive

This article applies to the Xbox 360 S console with an internal removable hard drive


Xbox 360 S
The Xbox 360 S 250 gigabyte (GB) console has an internal hard drive, which can be removed and replaced. The Xbox 360 S 4 GB console has internal flash memory, which is not removable. The internal hard drive can be purchased separately.

For instructions for the original Xbox 360 hard drive, see the following article:
How to attach or remove your original Xbox 360 hard drive

To add or remove your Xbox 360 Slim 250G hard drive

To locate and open the hard drive cover
  1. Turn off the console.
  2. Position the console horizontally.
  3. On the right side of the console, locate the release for the hard drive cover. It is close to the back of the console.
  4. Slide the release toward the front of the console, while pulling open the hard drive cover.

    Slide the release to open the hard drive cover

To remove the hard drive
  1. Firmly pull the tab on the hard drive until the hard drive comes out.

    Pull the tab on the hard disk firmly
  2. Replace the hard drive cover before turning the console back on.

To add a hard drive
  1. Insert the hard drive into the slot, and press firmly until you hear it click.

    Press the hard drive firmly into the slot


    Note If after you turn the console back on you receive the error message “No storage devices found,” then the hard drive might not have been inserted completely. Remove and try again.
  2. Replace the hard drive cover.

Tuesday, May 29, 2012

How to improve the Speed of Your Xbox Live Connection

Playing on Xbox LIVE can be extremely fun however; when playing online, and the game starts to slow down and freeze (also known as lag). The game can be quite frustrating. This can because by many things and this article will describe how to fix this problem.

Steps

   1. First find out what is causing your speed to slow down (lag). This can be cause by....
     # The host of the match might be far away from you and it's difficult for        you to have great signal strength with someone half-way across the world.
     # Somebody might be cheating in the game via lag-switch. Which is a modification of the Xbox Console that can scramble all the other players connection. This voids the warranty of the Xbox and can get you banned from Xbox LIVE. There are more than 100 versions of lag-switches some homemade and some bought from stores (not supposed to be used for this purpose the ones bought for stores are supposed to be used to speed up computer connection but can be solder to the Xbox and be used for the reversed purpose of slowing down others connection and speeding up yours. I will describe the different kinds at the end of the article.
     # Just a bad connection this looks similar to a lag-switch however; its really just the host connection has dropped or slowed down causing everybody to have a slow connection but, it will show the host as having full signal strength when they actually don't.

   2. Your connection may be slow, or your connection may be set to moderate or strict. This can be changed by turning off your wireless router/unplugging your network connector from Xbox. if this doesn't work than read Change Your Nat Type on Xbox Live.

   3. After identifying the problem you can try and boost connection speed.
      If the problem is lag-switch related, or host connection problems... then unfortunately there is nothing you can do to fix this.

   4. If the problem is your connection then you may need to get a better network connector for your Xbox. You may also have to close out some programs on your computer. As this can slow down connection speed across anything connected to your internet.

Wednesday, March 28, 2012

How to fix Xbox 360 overheating

The Xbox 360 is definitely a marvelous gaming device- there is no doubt about it. However, like any other gadget, the Xbox too is prone to certain technological problems. One of the most common problems that Xbox 360 owners would be aware of is the overheating issue.

Although the people at Microsoft may claim that the device does not heat up too much, the fact is a mean gaming machine like the Xbox 360 cannot stay cool consistently. Moreover, the design of the 360 makes heat dissipation problematic, so overheated Xbox 360s are not an uncommon sight. In fact, the series of red light errors that every Xbox 360 gamer dreads are more or less caused by overheating issues.

So what can you do to stop overheating problems from disrupting your gaming time? Fixing Xbox 360 overheating issues may seem to be the stuff for hardcore techies, but with the following easy steps, you too can learn how to fix Xbox 360 overheating:

    1. You first need to see if your Xbox 360 is still under warranty. If it is, then its best if you give your console over to the Microsoft technicians. If you still want to fix the console yourself, you must remember that it would require you to disassemble your Xbox 360, which voids your warranty. If you are prepared to risk that, then you can move on to the next step.

    2. The next step for fixing your 360’s overheating problem is to open up the console. First remove the front panel of the console. Once this is done, take off the top and bottom vents and then remove the side casing of the console.

    3. When the outer casing of the console has been opened up, you would be able to see the inner metal chassis. You would now have to remove the metal cover of this chassis by removing 6 screws at the periphery of the cover.

    4. Once you remove the cover, you would see the DVD drive of the Xbox 360. You now have to remove this DVD drive to reveal the CPU and GPU or graphics processing unit of the console. In most cases, the Xbox 360 overheats because of bad cooling around the GPU, so your focus is on that piece of equipment.

    5. At this point, you would need an Xbox repair kit in order to fix the overheating issue. You can get these kits anywhere and even find some online. If you do not want to get a repair kit, you will need some nylon and steel washers, long screws, and some heat sink paste.

    6. The best way to rectify the overheating problem is to improve the cooling system just a little bit. You can do this by scrapping off the old heat sink compound off the GPU and applying a thin layer of the new element.

    7. The washers are required for getting your GPU in contact with your motherboard. This is to be done as you begin assembling back your Xbox 360.

The whole process takes around 1 hour to complete, and 2 hours for most technologically challenged individuals.

How to fix Xbox 360 1 red light

The Xbox 360 may be considered to be the ultimate gaming console by many, but it does have its share of problems. The ‘red ring of death’ error has been a nightmare for most Xbox 360 gamers ever since the console was launched, but it is not the only problem you would come across.

Another common problem that you may witness while playing the latest games on your Xbox 360 would be the single red flashing light. In fact, the 1 red light problem is almost as common as the 3 red lights problem (the red ring of death).

Here is a look at some steps you need to follow to solve the Xbox 360 1 red light problem:

   1. Check if your Xbox 360 is still under warranty. If the warranty is still functional, then it is always better to get your Xbox fixed through Microsoft. Fixing your console by yourself might void your warranty, so you have to use it while it lasts.

   2. If your Xbox 360 is out of warranty, then you would need to seriously consider fixing the problem yourself. Microsoft charges a lot of money for repairs when the warranty period is over, but you can learn how to fix Xbox 360 1 red light problem quite easily. This particular problem, also known as the e74 error, is usually caused by a problematic GPU, but you do not have to disassemble your Xbox 360 just yet.

    3. In most cases, you can trace the 1 red light problem to your AV cords or HANA chip. You could try using your AV chord on someone else’s Xbox 360 to see if it works properly. Alternatively, you could get it checked at your local electronics store. If your AV cord is problematic, you can replace it and solve your 1 red light problem.

    4. In some cases, the 1 red light problem may occur if your hard drive is problematic. You can find out if your hard drive is the culprit by removing it from your Xbox 360 console and restarting the system. If your console works perfectly well, you could try putting back the hard drive to see if it starts up again. If your console shows the red light again after you insert your hard drive, you know where the problem lies.

    5. If your AV cord checks out, it is time to test your HANA chip. This chip is located near the plug in the AV cable point on the inside of the console. Alternatively, it could also be a problem with your GPU. If this is the issue, you may have to disassemble your console to solve the problem.

You could try placing a magnet over your GPU to get it working again, but this works only if you are lucky. As you can see, the e74 error occurs either due to a faulty hard drive, AV cord, HANA chip, or GPU. In all cases, you would need a replacement of the problematic equipment for your Xbox to work again. However, if your hard drive is the one causing problems, you can still play games on your console.

How To Fix Xbox 360 E71 Error

Your Xbox 360 may display error code E71 when something goes wrong during dashboard update. When this happens, the following error message will display on the console:

E71:Dashboard Error - Error within Xam.xex

How to Fix Xbox 360 E71 Error

You may use the following methods to fix this error:

Method 1: Clear console cache and installed updates for games

    Open the system blade on your Xbox 360 console.

    Select the Memory command.

    Next, press Y for HD.

    Also, press X, X, LB, RB, X, X. (here, LB stands for Left Bumper and RB stands for Right Bumper)

    Select Yes when the following message is displayed on the console:

    "Do you want to perform maintenance on your Xbox 360 storage devices?"

Once the procedure is over, check your Xbox to see if the error is gone. If it persists, proceed to the next method.

Method 2: Get rid of failed system updates

Failed system updates are a major cause of E71 error on Xbox 360. To remove these updates from the system perform the following steps:

    Shutdown and unplug the console.

    Press the small white sync button and hold it for a while.

    Plug in the console and turn it on, while continuing to hold the sync button.

    Keep holding the syncbutton until the Console finishes booting up.

When you hold the sync button when the Console is booting up, all failed updates are cleared from the system.

    Once the booting completes, start using the system to see if the error goes. If it still appears, proceed to the next step.

Method 3: Disconnect all Xbox 360 components and then reconnect them

Quite often Xbox 360 E71 and other errors occur when one or more of the components connected to the system are loose or malfunctioning. To resolve these issues, perform the following steps:

    Shutdown the console and remove it from power.

    Now remove all components, except for the hard disk.

    Now plug in and restart the console.

    Once it has booted up, start adding the components one by one:

        If the power light starts flashing red after you add a particular component, this component might be malfunctioning and you will have to get it repaired or replaced.

        If works well after you have made the connections, it is quite likely the error occurred due to loose connections and you have resolved it now.

Method 4: Disconnect and then reconnect the hard drive

To check if hard drive is cause of the problem, do the following:

    Shut down the console and detach the hard drive.

    Restart the console.

    If it starts without any errors, the hard drive is the likely cause of the problem. You will have to replace it to resolve the error.

Method 5: Make sure that your Xbox 360 is not getting overheated

One of the major causes of most Xbox 360 errors is overheating. Quite often, if you shutdown your Xbox 360 and give it an hour or two to cool down, the errors get resolved automatically. However, to prevent a situation like this, and prevent overheating, make sure that your Xbox is well-ventilated and free from dust deposits. Also, keep it on a hard surface and not a rug or a carpet.

Incorrect soldering of internal components and problems with X-clamp placement may also cause these errors. To fix these errors, you may have to send your Xbox 360 to Microsoft for repairs.

Hopefully by reading this article of how to fix Xbox 360 e71 error will bring to and end  the error e71 problem on your  Xbox 360.

Monday, February 6, 2012

How to Connect an Xbox 360 to a Laptop

The Microsoft Xbox 360 gaming console has a built-in multimedia feature that allows it to connect to a laptop through your wireless network. Once the laptop is connected, you can use its Internet connection to access the Xbox Live Marketplace to download new content or even transfer files directly from the laptop to the console.

Instructions

 1. Purchase either an Xbox 360 wireless adapter or an Ethernet cable if the Xbox 360 console is close enough to your wireless router to be connected via cable (see Resources below). Connect the male end of the wireless adapter into the female port located on the back of the console or plug one end of the Ethernet cable into the Ethernet port on the console.

 2. Turn on the laptop and click the "Start" button. Click "Control Panel" and wait for a new window to appear. Double click the "Network And Sharing Center" icon.

 3. Check the top-right side of the screen and find the name of your wireless network. Write down the name and then power on the Xbox 360 console. Scroll through the main menu options. Press the "X" button on the controller when you reach "Settings."

 4. Choose "System Settings" and then choose "Network Settings." Scroll down to the text field and type in the network name you wrote down earlier. Press the "A" button on the controller to save the change.

 5. Return to your laptop and navigate back to the Network and Sharing Center area. Click "View Computers and Devices" and then click on the icon for your laptop. Wait for your laptop to detect the Xbox 360 console and then click "Yes" when a window appears, asking if you want to connect to it.

 Tips & Warnings

    If your laptop is using an older version of the Microsoft Windows operating system, the "Network and Sharing Center" icon may instead just say "Network Center." Any music files you have saved in the "Music" folder of the Windows Media Player application will automatically stream from your laptop to the Xbox 360 console.


Tuesday, January 10, 2012

Xbox 360 Error codes

THIS ERROR CODE GUIDE IS IN NO WAY OFFICIAL NOR DO WE MAKE ANY CLAIMS TO IT'S ACCURACY. 100% of the info here was discovered by Scene Members through trial and error, a lot of the information is probably incorrect, but it is our best guess. If you discover something that is incorrect or not included please PM twistedsymphony to update the guide. Neither Xbox-Scene, twistedsymphony, nor any of the guide contributers take responsibility for any actions you might take as a result of reading this guide.

--==ERROR Codes==--
If there is a problem with the Xbox360 The LEDs in the ring of light will flash in a particular pattern. The pattern itself leads some insight to the problem. Certain patterns will lead to numbered error codes which will provide further insight to the problem. The numbered error codes are described below their corrosponding LED code.

these are the codes we know so far...
Please contribute if you know of new codes that are not part of this list.

=============================

Sections 1, 2, 3, and 4 are flashing red
- The AV cable cannot be detected
/ \
\ /


THINGS TO TRY
  1. Make sure that the AV cable is correctly connected to the Xbox 360 console.
  2. Disconnect the AV cable from the Xbox 360 console, and then reconnect the AV cable to the Xbox 360 console.
  3. If the four flashing red lights continue to flash, try wiping the metal area of the AV pack with a dry cloth. The metal area is the end that plugs into the console. Wipe the metal area thoroughly, and then try the AV Pack again.
  4. If the AV cable is correctly connected but the four red lights are still flashing, substitute a different AV cable if you have one available.
=============================

Sections 1, 3, and 4 are flashing red
- General Hardware Failure
/ \
\ /

Check out this tutorial!  If you are getting the 3 Red Light Fix (AKA Three Red Lights of Death, 3RLOD, Red Ring of Death, X-Clamp Fix) This link has the information you need!!


Check the secondary Error Code per the instructions in the section below

THINGS TO TRY
  1. Try restarting the console.
  2. If restarting the console does not resolve the behavior, follow these steps:
    • Turn the console off.
    • Unplug all the power and AV cables from the console.
    • Unplug the power cord from the wall socket.
    • Firmly reconnect all the cables.
    • Turn on the console.
  3. If these steps do not resolve the behavior, turn the console off, remove the hard drive, and then turn on the console. If the 3x Red LED error light is no longer displayed, turn the console off, re-attach the hard drive, and then turn on the console.
  4. Also examine the lights on the power supply. When you turn on the console, the power supply light should illuminate green even if the three lights on the RoL flash red.
=============================

Sections 1, and 3 are flashing red
- Overheating
/ \
\ /

Alternativly Overheating can be cause by the console locking up or "freezing" after a set amount of time. Lockups that occur at a specific point in a game are generally problems with the game itself and not caused by overheating.

THINGS TO TRY
  1. Let the Xbox 360 console cool.
    Note You may have to wait several hours for the console to cool enough. Do not turn on the console when the console is hot.
  2. Verify that the console has sufficient ventilation and that the fan is operating. For more information about ventilation, see the "More Information" section.
PREVENTION SUGGESTIONS
To try to prevent this problem, use the following precautions:
  • Do not block any ventilation openings on the Xbox 360 console.
  • Do not put the Xbox 360 console on a bed, on a sofa, or on any other soft surface that may block ventilation openings.
  • Do not put the Xbox 360 console in a confined space, such as a bookcase, a rack, or a stereo cabinet, unless the space is well-ventilated.
  • Do not put the Xbox 360 console near any heat source, such as a radiator, a heat register, a stove, or an amplifier.
DO NOT EVER PUT YOUR CONSOLE IN THE FREEZER OR OUT IN COLD WEATHER
Some people think that doing this might help "fix" an overheating console, in fact doing so could cause even bigger problems. Electronic devices like your console are made to function at and around room temperature, extreme cold temperatures can often cause just as many problems as extreme warm temperatures (such as overheating). Also if the console is located in a dramatically cold area while running, the difference in temperature between the hot console and cold air can create condensation which in turn will short out your console making the situation far worse. Condensation will happen more quickly if your console is overheating due to the greater difference in temperature. In short... DON'T DO IT.

A more agressive Solution to overheating is to improve the cooling system of the console. The best solution is to replace the thermal compound. If you attempt this you do so at your own risk. If you're console is still underwaranty it is recomended that you contact MS for a replacement before attempting to fix it yourself.

=============================

Section 4 is flashing red
- Hardware Failure
/ \
\ /


The Specific Type of hardware failure can be determined by the error code displayed on the screen.
If the screen is blank or you would like additional information follow the instructions for determining the secondary error code in the section below
E45: Unknown (possibly dashboard update related)

E64: DVD Drive Error.... DVD Timeout, Wrong firmware, dvd is without f/w chip, etc.

E65: DVD Drive Error.... DVD Timeout, Wrong firmware, dvd is without f/w chip, etc. This can also be caused by the tray not being fully closed on boot.

E66: DVD Drive Error: DVD model, or version does not match that of the version expected by the dashboard. OR the firmware version on the drive is older then the firmware version expected by the dashboard. Make sure the DVD drive is of the same version originally included with the console and that it is using either the original firmware included with the console or newer.

E67: Hard Drive Error... It could be a problem with the Hard Drive itself or a problem with the internal connection to the hard drive, Try removing the hard drive and playing without it

E68: Hard Drive Error... It could be a problem with the Hard Drive itself or a problem with the internal connection to the hard drive, Try removing the hard drive and playing without it, This can also be caused by a Hard Drive Eprom Error. Some also believe this might be caused by a problem with the fans.

E69: Hard Drive Error... It could be a problem with the Hard Drive itself or a problem with the internal connection to the hard drive, Try removing the hard drive and playing without it

E71: possibly a dashboard update error, Check below in the "Console Reset Codes" for instructions. If that does not work there is no other solution and the console must be sent back to MS for repair.

E72: (not yet known)

E73: General Hardware Error: Ethernet port... this error is caused by a problem with the Ethernet port.

E74: AV cable error... There is a problem with the AV cable, try using a different AV cable. If the cable is known to be working then there is a 90% chance it's a scaler chip problem (the "ANA" or "HANA" chip connected directly to the AV cable) in rare cases it is the GPU.

E76: (not yet known)

E79: Hard Drive Error... It could be a problem with the Hard Drive itself or a problem with the internal connection to the hard drive, Try removing the hard drive and playing without it

=============================
--==SECONDARY ERROR CODES==-
The specific type of hardware failure can be determined by a "hidden" error code
  • Turn the xbox 360 on, and wait till the 3 red lights are flashing.
  • Press and hold the sync up button (the small white one), while holding that button press the eject button.
  • The LEDs will now blink the first number in the code (as described below).
  • Release the eject button and press it again.
  • The LEDs will now blink the second number of the code.
  • Release the eject button and press it again.
  • The LEDs will now blink the third number of the code.
  • Release the eject button and press it again.
  • The LEDs will now blink the forth number of the code.
  • Release the eject button and press it again.
  • The LEDs will go back to the 3 red flashing lights.
You should be able to determine the difference between the 3 flashing lights and the error code lights by the rate in which they flash.

Here is how you interpret the LEDs to get the code number:
  • All four lights flashing - 0
  • One light flashing - 1
  • Two Lights flashing - 2
  • Three lights flashing - 3

0001 power supply problem
0002 Network Interface problem
0003 Power problem could be the PSU could be the GPU/CPU, somehow the console isn't getting clean power from the power supply.
0010 over heating
0011 over heating - If you are receiving this error after disassembling your console make sure to all 8 of the heatsync screws are tightened securely to the board/heatsink holes.
0012 over heating
0013 over heating
0020 (Not yet known, possibly overheating)
0021 DVD Drive Time out - Can be caused by problems with a firmware flash. This is also speculated to sometime be caused by a problem with the southbridge chipset on the motherboard.
0022 GPU Error / GPU Overheating
0023 (not yet known)
...
0101 (not yet known)
0102 unknown error
  • though it's most likely GPU related literally means the console does not know what is wrong. possibly a short or cold solder joint somewhere. So far there is 1 major theory for what causes most of these errors is that the Ram, CPU, or GPU are not soldered properly to the mother board due either to poor manufacturing or excessive heat up and cool down cycles that stress, weaken and eventually break the soldered connection.
    There are two theories to fixing this one deals with the "X" clamps that hold down the chips. The other involves re-Heating the chips. DO NOT attempt either of these if your console is still under warranty. If your console is still under warranty return it to the store where it was purchased or call MS to have it replaced. I have also heard of limited success by simply switching the AV cable from "HDTV" mode to "TV" mode.
0103 CPU Error/ CPU Overheating - see solution for error 0102
0110 Memory Error / Memory Overheating - see solution for error 0102
...
0200 (not yet known)
...
1000 (not yet known)
1001 (not yet known)
1002 (not yet known)
1003 Hard Drive Error... It could be a problem with the Hard Drive itself or a problem with the internal connection to the hard drive, Try removing the hard drive and playing without it
1010 Hard Drive Error, Can be caused buy a corrupt or missing eProm.
1011 (not yet known)
1012 (not yet known)
1013 (not yet known) possibly a dashboard update error
1020 (not yet known)
1021 (not yet known)
1022 AV cable error... There is a problem with the AV cable, try using a different AV cable. (could also be a problem with the encoder chip)
1023 DVD drive not connected, connect DVD drive to boot
1030 (not yet known)
1031 (not yet known)
1032 (not yet known)
1033 (not yet known)
...
1444 and up There is no "4" in the error codes four lights is a "0" go back and check your code again.

=============================
--==Console Reset Codes==--
Clear All Installed Game Updates and Console Cache
  1. Go to the "system" blade
  2. Select "memory"
  3. Press Y on the HD symbol
  4. Press X,X, Left Bumper, Right Bumper, X,X
  5. A message will appear saying: "Do you want to perform maintenance on your Xbox 360 storage devices?"
  6. Select Yes
Clear Any Failed system updates that cause the console to error.
  1. With the console off, press and hold the sync up button (the small white one)
  2. While holding the sync button press the power button to turn on the console
  3. Continue to hold the sync button until the Console has booted up completely.
  4. During the boot process the console should clear any failed updates, allowing you to use it normally.
=============================
--==Sending in your Console for Repair==--
If none of the above suggestions work, contact MS customer support get get a support ticket started. If your console is still under warranty DO NOT attempt to open it and fix it yourself. MS will fix it promptly and for free and if you open it you loose the free support.

Check the documentation that came with your Xbox 360 for contact information.

In the US Customer Support can be reached at 1-800-4-MY-XBOX (1-800-469-9269)

=============================

Llamma's Xbox 360 3RLOD (three red light error) X-Clamp Fix Tutorial

If you are one of the few who is not familiar with the Xbox 360 Red ring of Death than consider yourself lucky.  Unfortunately, a large number of folks know all to well from their own experience.  Fortunately for those who have not opened their console for any reason Microsoft has extended the warranty of ANY console experiencing the 3 red lights failure for a full three years from the manufacture or purchase date.
NOTE: If you are getting the three red lights and you have not opened your console by all means call Microsoft first at 1-800-4MY-XBOX this will get you in touch with customer support.
For the rest of us who have opened their console for one of many reasons like adding a suped-up case or even a well overdue cleaning for that matter, there is a viable solution; the "x-clamp fix". 
For most consoles only the GPU x-clamp needs to be replaced, but some also require the processor clamp be replaced as well.  For this tutorial we will be doing both clamps at the same time.  We suggest you do both right away since even if yours does not require the processor clamp replacement it will not hurt to do it and it only takes slightly longer to complete the fix.
  You do not have to use our kit but it is important to have proper spacing between your heatsinks and the motherboard.  We have chosen our hardware to be exactly what we wanted and needed.  Not all washers are the same thickness so be careful in your selection.  Ours are 1mm thick each and is necessary for success using this tutorial.  If you are using smaller more thin washers or vice versa you will need to figure out how many you need to achieve the same thickens as what is described below
We put together an All In One Xbox 360 Ring of Death Repair Kit with all the hard to find tools and supplies you will need in one easy package.


Talismoon Whisper Max Once the kit has been installed I regularly get questions like.  "Now that it is working is there anything I can do to make sure it keeps working?"  We do have two highly recommended upgrades that will help.  Put in a better fan and update to the HeatPipe Heatsink if you don't already have one.  Any of the Talismoon fans will run faster than the stock fan, if you go for the whisper max you will also get a turbo switch to run the fans at 12V.  The heatpipe GPU heatsink is part of Microsoft's solution to address the Red Light issue it is designed to move the heat from the GPU in front of the CPU heatsink where the flow of air is faster.
Supplies:
4 12mm Cheese Head Screws
8 M5 Nylon Washers - 1 mm thick
16 M5 Steel Washers - 1 mm thick
Kit (enough hardware for GPU or CPU get two kits to do both)
Arctic Silver heat sink paste

Arctic Silver ArtiClean heatsink paste remover
Tools:
360 Opening Tool
Torx T10
Torx T8
1/4" Nut Driver or Wrench/Pliers
13/64 Drill Bit and Drill
Large and small slotted Screw Driver

 
We have found a combination of hardware we like best.  We went with a longer screw than some recommend for ease of installation.  We use 16 of the M5 x 1mm washers, 8 Nylon M5 x 1mm washers and 4 M5 Cheese head 12mm screws. 
  To install this you will need to disassemble your Xbox 360 
  Remove the DVD drive by loosening the tape in the front of the console, lift the DVD drive and detach the two cables from the motherboard at the rear.
Remove the fan shroud using a small slotted screw driver or any other small flat tool to push the tab holding it in place and lift up and out.
Next, unplug the fan.  Then lift up on the steel flap holding the fan in place while pulling it toward you.
Remove the power button / wireless controller board using your T8 driver.  There are three screws; one is hiding behind the plastic LED lens cover.
Remove the all 8 heat sink screws (T8) holding the processors to the chassis.
  Remove the remaining motherboard screws using your Torx T10. 
At this point the motherboard will lift out.  The GPU heatsink is a great place to lift the board up and out.
With the motherboard removed we can now access the X-Clamp that we will be replacing.  This is a somewhat tricky part and care should be taken to not be to aggressive and end up damaging the board.  We begin by wedging a small flathead screwdriver between the clamp and the stud.  Then gently rock the screw driver back and forth and the clamp will eventually work its way up and off of the stud.  The third will become very easy to remove and then it will just pop right off.
With the clamp(s) removed the heat sinks just lift off.  Some heatsinks are more difficult to remove than others because the heatsink paste is still sticky.  Using your finger to push the stud through the hole works great for the more stubborn ones.
Once the heat sinks are free we are able to use our 1/4" nut driver, wrench or pliers to remove the studs.
To prepare the steel case we use a 3/16 or 13/64 drill bit to enlarge the 4 heatsink mounting screw holes for each of the heatsinks to be repaired so the larger M5 screw can be installed.  We use a Uni-bit for the task as it's first step is the 3/16ths we need and it also deburs the hole at the same time.  Spacing between the heatsink and the board is critical in this repair so make sure to clean off any stray steel shavings and burs; particularly on the board side of the steel chassis as this can impact your success.
Install all the screws and use some tape to hold them in place.  This makes it much easier to keep everything in place.  If you choose not to do this that is fine... but when your cleaning up a bunch of washers and starting over again don't say we didn't warn you.
Let the ring toss begin! Add 3 steel washers to each of the screws, followed by a single nylon washer.  It is very important to make sure you have three steel washers first and then a nylon washer last to isolate and protect the motherboard from damaged traces or shorts.
Now that everything else is prepped its time to clean and prepare the processors themselves.  Start by removing as much of the old heat sink compound as you can with a tooth pick.  If you cannot get your hands on some ArctiClean, then use something like goo gone and a Q-tip to remove the excess compound from on and around the processors die.  Alcohol will work also but it is no where near as effective at removing the old sludge.  Follow up the job with a little alcohol to remove any leftover goo gone or other foreign oils or debris.  The processor dies should be clean and shiny.
Next we need to apply a thin coat of thermal compound to the die.  The old adage "a dab will do ya" definitely applies.  Notice in the photo on the top the amount of compound we have used; this is more than enough.  You are looking for a skim coat similar to the thickness of plastic wrap.  The photo on the bottom is a example of what you should NOT do.  Silver based compounds can have adverse effects when in contact with electrical components not to mention the thermal compounds efficiency is greatly reduced when too much is applied.
  Now reinstall the motherboard, you may have to adjust the positioning of the screws to get them to fit through the motherboard.
Now with the motherboard in place install the final two washers, a nylon one first followed by a steel one.  Again it is extremely important to have TWO washers between the heat sink and the board.  One nylon washer first to protect and isolate the motherboard and one steel... just to be redundant that makes two washers.
  Place your heat sinks onto the screws and hold them in place with one hand while carefully putting a couple of turns on each screw to keep the washers from falling off.  I place the unit on the edge of a table and from below poke my screwdriver through the tape and turn the screw in a few threads.  Do not tighten any of them completely yet.
  Now that everything is in check, peel the tape off of the screws and prepare to tighten them down.  Turn each screw gently until you feel a little resistance.  Do this to every screw before actually tightening them down.  Now similar to the technique used in mounting your wheels on your car or bolting down a head on your motor; begin to tighten each bolt slowly in a kitty corner fashion making sure to evenly distribute the pressure across the processors die.  Tightening down one side and then the other can result in a cracked processor die.  With your large screwdriver put the final turns on each screw.  You really cant make them too tight unless you actually strip out the heat sink which would require quite a monkey fisting.
  Now your ready to complete the fix.  Reconnect your power button assembly/wireless board.  Plug your fan back in but do not reinstall it in it's original location yet; also DO NOT put your fan shroud back in yet.  Connect your DVD drive so as to not get banned from Live for powering up your box without the drive connected.  Now with your Xbox basically re-assembled except for the fan shroud, plug your power and video cords in and proceed.
  Now for the most important part and most likely the point where the majority of people who were unsuccessful completing this fix failed.This step requires you to overheat your GPU.  Many tutorials tell you to unplug your fan and turn it on until it overheats.  There is one major flaw with this approach.  The thermosistor for the overheating protection of the 360 is contained within the CPU.  The problem is that the CPU overheats without any airflow before the GPU is able to get sufficiently hot to "reflow" the BGA solder connection that has failed.
In order to cool the CPU but not the GPU it is again important to have your fan shroud removed.  Now take your fan that IS plugged in and lay it on top of your DVD drive with one of the fan's over the top of the CPU.  This will keep the CPU plenty cool to prevent it from overheating while the GPU will get smokin' hot; like burn your finger hot!
  Now power on your 360.  Some boxes may just work at this point because just pressure alone was enough to make the GPU's connection good.  I still like to overheat even those just to make sure I don't have to deal with it again.  So now you should be getting the three red lights like your were expecting.  You want to overheat the unit for at least 30 to 45 minutes.  The key is in the lights;  as long as it is flashing the 3 red lights (1,3,4) then your are in good shape and the overheating process is working.   What you DO NOT WANT is for the unit to actually overheat giving your TWO flashing red lights (1,3) at which point the 360 cuts off power to both the CPU and GPU preventing them from actually getting hot.  Again is probably the difference between someone who succeeds and someone who fails.
  Now that you have sufficiently heated the GPU, power down your Xbox 360 and let it cool down completely (ten to fifteen minutes should be more than enough).  Replace your fan shroud; you should now be fully assembled except for the case itself.  At this point you should cross your fingers and power your box back on.  If all went well your should now have a working 360!  Congrats!
  If it did not work for you its not completely a bust yet.  I suggest tightening the screws down even more and overheating yet again... some units are stubborn!
  Happy Gaming for those who were successful!

Twitter Delicious Facebook Digg Stumbleupon Favorites More

 
Design by Free WordPress Themes | Bloggerized by Lasantha - Premium Blogger Themes | Best CD Rates
YouSayToo Revenue Sharing Community